Writing BASIC
You write BASIC as plain text: one numbered line per statement, with keywords written as words. The editor highlights the active dialect, autocompletes keywords, and underlines errors as you type.
Each machine has its own dialect with its own rules - the selector in the toolbar chooses which one the editor and emulator use. Moving a program you have already written to another machine? The porting guide sets any two dialects side by side and says what has to change.
Example
The example below is for the ZX81; the other machines follow their own syntax.
basic
10 LET S=0
20 PRINT "GUESS A NUMBER 1-10"
30 LET N=INT (RND*10)+1
40 INPUT G
50 IF G=N THEN GOTO 90
60 IF G<N THEN PRINT "HIGHER"
70 IF G>N THEN PRINT "LOWER"
80 GOTO 40
90 PRINT "GOT IT!"
Editor features
The editor offers a rich set of modern features to assist with BASIC coding. Everything below is configured from the Settings button in the toolbar (the Editor section) unless noted.
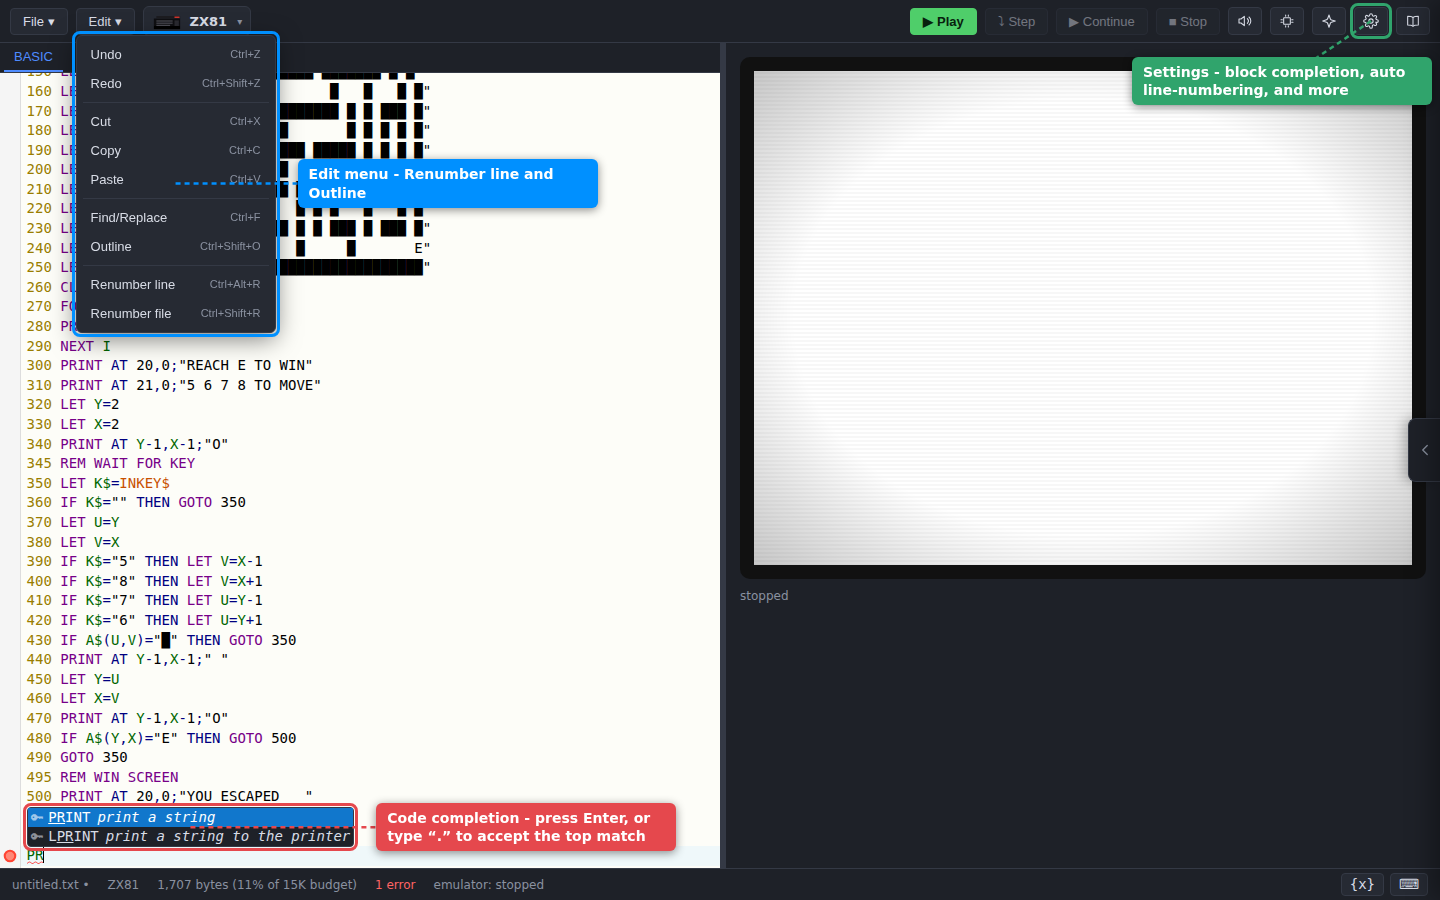
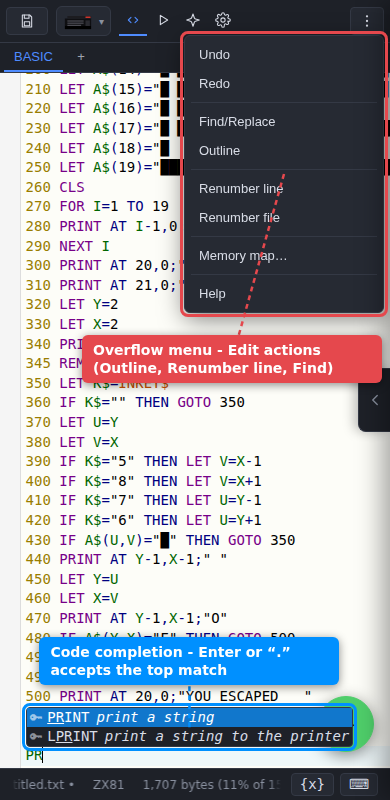
On a phone the toolbar is tighter: the Edit actions move into the ⋯ overflow menu, and the same code completion popup appears as you type.
Code completion
As you start typing a keyword, a suggestions popup opens automatically, with the best match highlighted at the top. Press Enter to accept the highlighted suggestion.
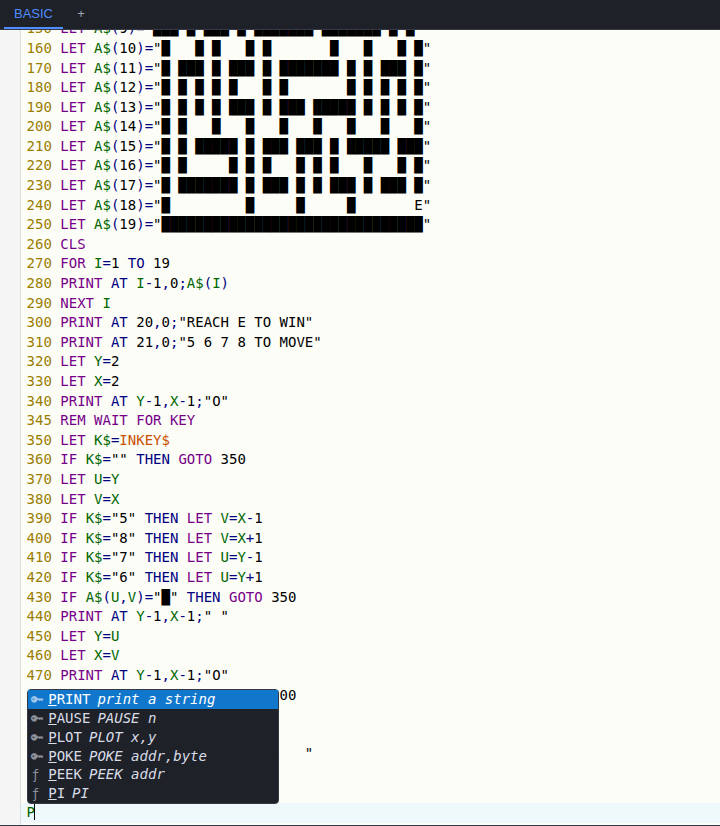
With Full code completion (expand keywords to blocks) switched on, structural keywords expand to a whole skeleton rather than a bare word. Accepting FOR drops in a complete counting loop, IF an IF … THEN line, etc. The cursor lands on the first thing you need to fill in (the loop variable, the condition…); press Enter / Shift+Enter to jump forward and back through the remaining fields. Turn it off to get plain keyword completion only (no block expansion).
Dot abbreviation
While the popup is open you can also accept the top suggestion by typing a . (period) - a shortcut inspired by the BBC Micro's keyword abbreviations. The dot is the trigger and is not inserted, so typing PR. completes to PRINT, and P. completes to whatever P… currently tops the list.
Finding where a variable is used
Click - or tap - a variable name anywhere in your program. A small menu opens just under the name, the same place a completion popup would appear; choose Usages.
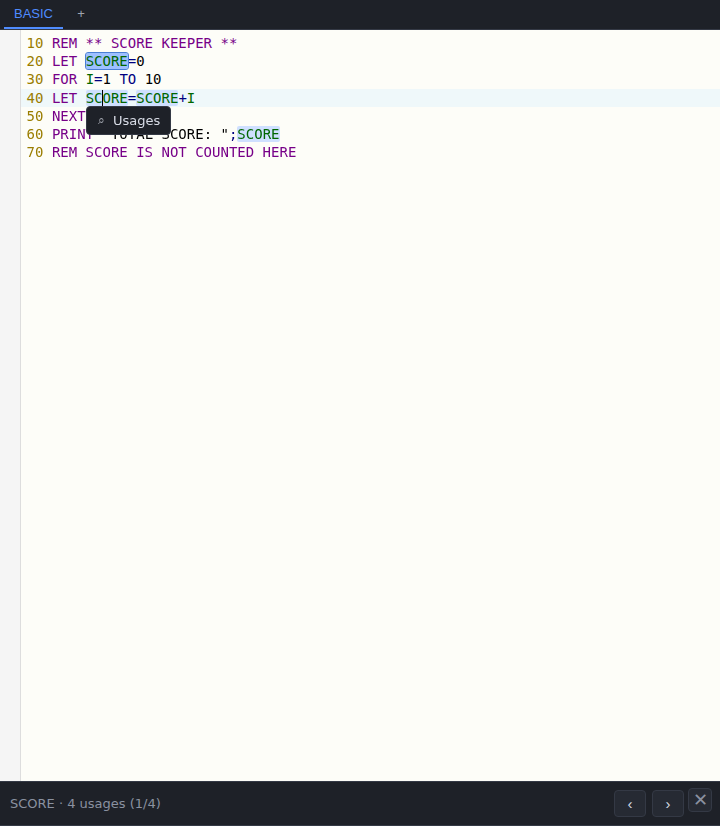
Every place that variable is used lights up, with the one you clicked marked as the current usage, and a bar appears at the foot of the editor naming it and counting them - SCORE · 4 usages (1/4). Use ‹ and › to step through them: the cursor moves to each usage in turn and the editor scrolls to bring it into view, so it works just as well on a program longer than the screen. ✕ (or Escape) clears the highlights, and so does typing - once you edit the program the answer may no longer be true, so ask again.
This is not a text search: usages are matched the way the machine you are targeting matches them. That is why the program above writes SCORE seven times and the bar counts four - the mentions in the REM lines and inside the printed string are not uses of the variable.
The rest follows the machine too. Whether upper and lower case are the same name depends on the ROM: on the BBC machines and the PMD 85 score and SCORE are two variables, on the others they are one. So does how much of a name the machine keeps - where only the first two characters are significant, HPX and HPY are the same variable, and both light up. An array and a plain variable of the same name are always separate, and on machines with named procedures a name local to a procedure stays inside it. The porting guide sets out these naming rules machine by machine.
The usages bar and the Find/Replace panel share the foot of the editor, so opening one closes the other.
Looking up a keyword
The same menu answers the other question you might have about a word in your program: what it does. Click a command, a function or an operator and choose Reference - the documentation opens beside your program at that keyword's entry on the reference page for the machine you are targeting.
It follows the machine, just as usages do. Only what your machine reads as a keyword offers the choice, so the PRINT inside a string or a REM comment does not, and neither does the punctuation that separates the parts of a line.
Keywords spelled short count too, on the machines that accept them. Pasting a listing written the way it was typed at the machine's own keyboard — P. on a BBC, pO or ? on a Commodore — the editor reads each spelling as the keyword it stands for: it is coloured as that keyword rather than as a variable name, it is not counted as a variable, and choosing Reference opens the entry for the keyword itself rather than for the abbreviation.
Automatic line numbering
With Automatic line numbering on, pressing Enter at the end of a line adds the next line number for you, so you can keep typing statements without managing the numbering by hand. The gap between numbers is set by Line number increment (10 by default).
Renumbering
To tidy a line number - or make space where an increment has run out - put the cursor on the line and choose Edit ▸ Renumber line (or press Ctrl/Cmd + Alt + R). Any GOTO/GOSUB references to that line are updated to match, so jumps don't break.
Outline
Edit ▸ Outline opens the Program outline: a list of the program's procedures and functions and the line numbers that GOTO/GOSUB jump to. Click any entry to move the editor straight to that line - a quick way to navigate a longer program. The outline tool reads nearby REM statements to give more descriptive naming of functions and jump points.
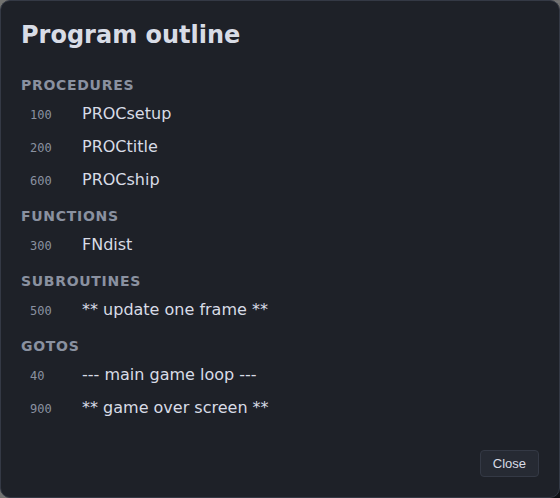
The sections that appear depend on the dialect: a machine with PROC/FN definitions lists Procedures and Functions, and every dialect groups the lines its GOSUBs and GOTOs jump to under Subroutines and GOTOs.
The tab strip
The strip above the editor holds your BASIC program, one tab per machine-code block, one per scratch buffer, and one per file a running program has saved. It shows as many of them as it has room for and does not scroll: the BASIC tab is pinned first, so the way back to your program is never hidden, and the width left over goes to the tabs you have used most recently. A tab you have just opened, and a file your program has just written, both count as recent, so they appear without your asking.
Anything that does not fit is listed by a count button at the end of the strip - +2, +7 - and choosing a tab from it brings that tab into view. Widen the window and the tabs come back on their own. The tabs that show always keep their usual order, so a tab never moves under the pointer as you use it.
Scratch buffers
To try something out without editing your program, press + after the last tab and choose New scratch buffer. Open as many as you like and click a tab to switch; each one is edited exactly like the program.
▶ Play runs the buffer you are looking at - the button names it, so it reads ▶ Play Scratch 1 - and a snippet takes your machine-code blocks with it, which makes a scratch buffer a good place to test a RANDOMIZE USR or SYS call. Breakpoints belong to the buffer they were set on.
Scratch buffers belong to the program they sit beside. They are kept when you save your project and come back when you open it again, and they survive a reload the same way your program does - though breakpoints, in a buffer as in the program, last only for the session that set them. Starting a new project or loading another program clears them along with the program they were written for, and you are warned first, so download anything you want to keep - right-click the buffer's tab and choose Download .bas - before you move on.
They go where your program goes. Switching the target machine and choosing Keep my code brings every buffer to the new machine with it; choosing Start new leaves them behind with the program they were written for.
Strict characters
Every machine holds only the characters its own set has, and where your program uses one it has not, the IDE converts it — most often folding a lower-case letter onto its capital. The program still runs; what changes is that the listing on screen is no longer the listing the machine holds, so typing it into the real thing would not reproduce it. The status bar counts those characters for you.
Strict characters turns that count into a refusal. Switch it on and every character the machine would store as a different one is marked as an error where it stands, exactly like any other error in the editor — which means the program will not run, and cannot be shared, until you change it. Exporting to tape or to a native file is unaffected.
On a machine with no lower case at all — the Sinclairs, the Apple I, the Atom, the TRS-80, the Altair — the editor also stops producing what it would only refuse: letters arrive in upper case however you enter them, typed, pasted or tapped on the on-screen keyboard, and that keyboard drops its shift key, since there is no other case to reach. Nothing else goes with it: every symbol, graphics character and key combination the keyboard offered is still there. Escapes, raw bytes and short keyword spellings are left exactly as written — their case is part of the notation, not text the machine stores.
The setting is off by default, and with it off nothing behaves differently: the character is converted, the program builds, and the status bar reports the count as before. Turn it off again at any time to get that back.
Keeping an eye on memory as you write
Retro machines have very little RAM, and two of the IDE's tools help you stay within it without leaving the editor.
The status bar tracks your byte budget live as you type: the size of your tokenized program against the target machine's available RAM. Keywords tokenize to single bytes and numeric literals carry an extra binary form, so the count reflects the real cost of each line you add - and it turns amber, then red, as you approach the limit. On the smallest machines (the unexpanded ZX81 has just 1K!) that's worth watching as you go, so you catch a program outgrowing its RAM while you're writing rather than when you try to run it.

If your program POKEs memory directly, keep the memory map (the memory-map icon in the toolbar) open beside the editor as a live reference: every POKE in your source is drawn as a marker at its address, so you can see which addresses you've already used - and where the machine's own screen, system and program areas sit - before you write another.
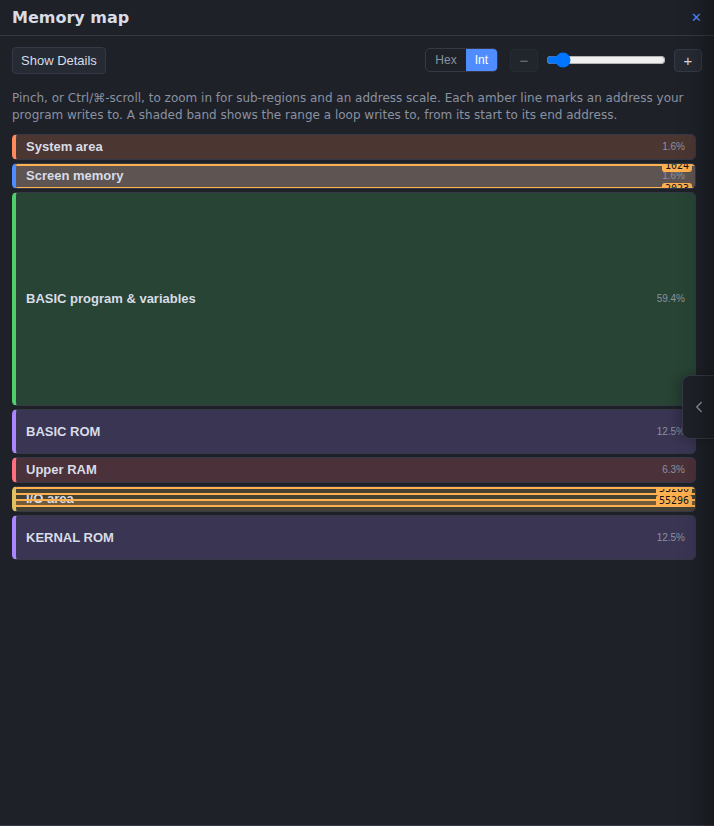
See Memory management for the full picture, including the live RAM readout, activity monitoring, and the variable watcher.
Special characters and tokens
How source text maps to the machine's character set and tokens - block graphics, inverse video, the quote-image character, and how numbers are stored - is covered in detail under File formats.